Note: This product has been deprecated and is no longer sold.
General Overview
CRM Integration is our custom solution to integrate your Sangoma Business Voice & Business Voice+ communications capabilities with your CRM of choice. Salesforce is the only supported CRM at this time, but we will be expanding support for other CRMs in the future.
CRM Integration consists of two different functions:
- Screen Pop: An interactive caller ID that sources data from your CRM and allows you to quickly jump to a CRM record from your desktop during a call.
- Call Activity Logging: A service that automatically logs call details into your CRM as call activity occurs.
CRM Integration has two kinds of users:
- Administrators: These users set up and configure CRM Integration for all end users of the customer.
- End Users: These users utilize Screen Pop on their computers during their day-to-day activities.
Connecting your CRM to CRM Integration
Your CRM must be connected to Sangoma’s CRM Integration service in order for CRM Integration to work. To do this:
- Login using your Sangoma portal credentials
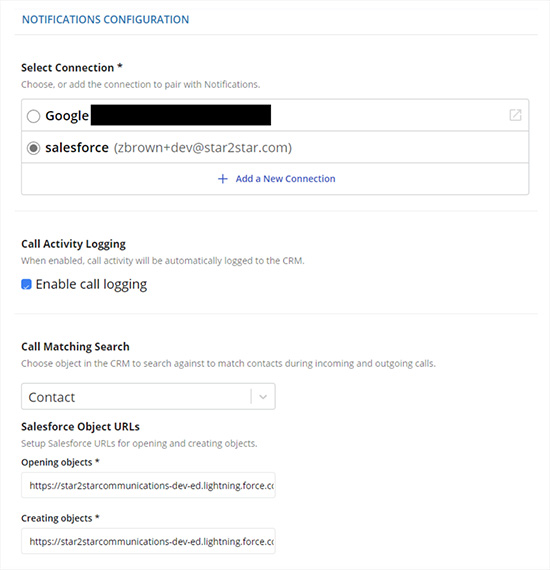
- In the Select Connection section, click the “Add a New Connection” button.
- In the portal that launched, click the Choose Provider dropdown and select your CRM of choice.

- Click the Next button.
- In the Policy section, click the Choose Policy dropdown and select your CRM environment of choice.

- Click the Create button.
- Some CRMs, such as Salesforce, provide access to multiple environments so that CRM developers can test changes without affecting day-to-day business. If you would like to connect a testing environment, you can do so here.

- When your CRM asks you to grant access to Sangoma’s CRM Integration service, allow us this access.
You can revisit this section at any time to add a new CRM profile. You can add as many profiles as you’d like, but only one can be active at any given time.
Set Up Call Activity Logging
Call Activity Logging is enabled or disabled via the checkbox in this section:
- If the box is checked, call logging will be enabled for the entire organization.
- If it is unchecked, call logging will be disabled for the entire organization. Screen Pops will still appear if call logging is disabled.
Configure Screen Pop
You can configure Screen Pop by changing the following options:
- Call Matching Search: This allows you to select which CRM object will be searched against to find matches during incoming and outgoing calls.
- CRM Object URLs: This is where you’ll put the formulaic URL your CRM uses for opening and creating new objects. Where the CRM inserts a unique ID, please insert the text.
- For example, if your URL is normally example.com/crm/12345, please type the URL as example.com/crm/
- It is required that you fill out this field in order for Screen Pop to function.
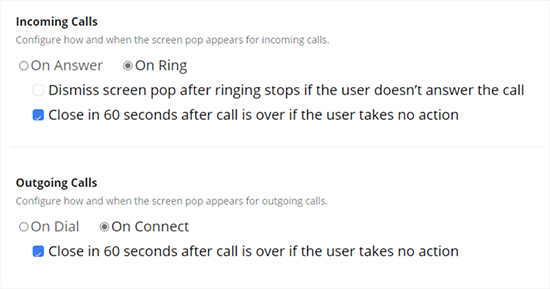
- Incoming Calls: This is where you’ll configure how Screen Pop behaves for incoming calls.
- On Answer / On Ring: If you select On Answer, screen pops will not appear until the end user answers the call. If you select On Ring, screen pops will appear as soon as the end user’s phone starts ringing.
- Dismiss after ringing stops if the call is not answered: If this option is enabled, screen pop notifications will automatically close themselves if the end user didn’t answer the call.
- In a calling environment where multiple phones ring on an incoming call, this option is useful to prevent non relevant notifications from appearing for end users who didn’t answer a particular call.
- Outgoing Calls: This is where you’ll configure how Screen Pop behaves for outgoing calls.
- On Dial / On Connect: If you select On Dial, screen pops will appear as soon as an end user completes a dial-out and the phone starts ringing. If you select On Connect, screen pops will not appear until the other party answers the call.
- Close in 60 seconds after call if user takes no action: If this option is enabled, screen pop notifications will automatically close themselves 60 seconds after a call is over if the user never clicked an option on that notification.


Salesforce.com CRM Specific Instructions to get CRM Object URLs
We currently support Accounts, Contacts, Leads, and Case objects
- To retrieve the New Object URL login to Salesforce
- Select the desired item tab that you want to match, Example: Contacts.
- Click on the New button
- You should see a "New Contact" form on screen
- Copy the URL from the address bar starting on https all the way up until the word new
- Here is an example of a full URL but only the required part in bold: https://awesomesalesforce.force.com/lightning/o/Contact/new?count=3&nooverride=1&useRecordTypeCheck=1....
- Example using the above URL: https://awesomesalesforce.force.com/lightning/o/Contact/new
- You can repeat the same process outlined above for the other call matching types.
- Sticking with the approach above, the Update Object URL would be: https://awesomesalesforce.force.com/
Saving Changes
When you make any changes in the admin area, you must save your changes for your selections to become active. If you do not save your changes, then they will not be applied.

